
One-Click Workspaces for Power BI CI/CD: Is It Possible?
Deploying one Power BI report to one workspace is easy enough. Deploying and updating the same "report/product" across multiple workspaces at multiple tenants is another story: the standard Power BI pipelines can't cover that, so another solution was required. In this blog we explain how we automated those deployment steps to release Power BI reports through code. The goal was an (almost) one-click deployment, with all connections preconfigured, from development straight to production. This setup reduces human error, saves time, and makes it easier to scale analytics work or launch new initiatives.
The building blocks are Azure DevOps, the principles of CI/CD, and tools like PowerShell cmdlets and the Power BI APIs. We'll cover the steps needed to automate the creation of workspaces, deploy and configure the datasets (nowadays called the semantic models) and link the reports to them. This is not a line-by-line look at the code, but a structured overview of the steps you need to take. You'll have to adjust the specifics to your own situation; the value is in pointing you towards a new thinking direction.
The Power of Power BI and PowerShell Automation
Here is the process for an automated CI/CD setup for Power BI, built on PowerShell, service principals, and APIs.
Step 1: Setting Up a Service Principal
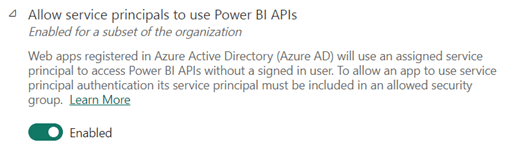
To start, you'll need a service principal. This handles authentication with the Power BI service. Assign it the necessary permissions in the Power BI Admin Portal, including API access: a lot of our scripts connect to this API, so without it nothing else works.
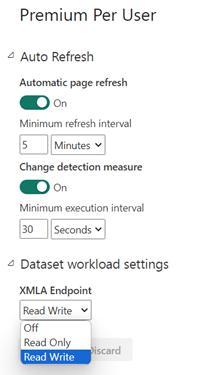
Be sure to enable Read/Write for the XMLA-endpoint, as otherwise you won't be able to publish the dataset. The XMLA-endpoint allows you to make changes to your semantic model through code: manage, load, update and recalculate its tables. We need it to deploy our semantic models.
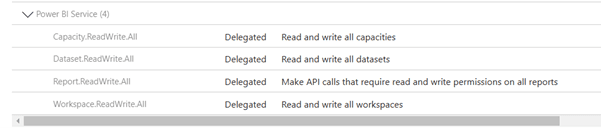
There are also changes required in the Azure Portal. Within Azure Entra ID, give "API Permissions" to the App Registration.
I suggest including just the necessary ones to get the job done:
Fabric: Workspace.ReadWrite.All
Fabric: Dataset.ReadWrite.All
Fabric: Report.ReadWrite.All
Fabric: Capacity.ReadWrite.All
With all of that in place, the automation can begin.
Step 2: Checking Existing Workspaces and Creating New Ones
Before creating a workspace, confirm whether it already exists. Retrieve a list of workspaces accessible to your service principal. If the desired workspace isn't there yet, create it with a Power BI API POST call, then assign the necessary access rights for specific users or security groups. That can be done with this API call:
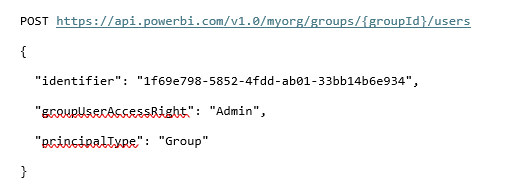
With this code you add the specified group as a member in the workspace with "Admin" rights. TIP: when testing, give yourself those rights too, as otherwise you won't be able to see the newly created workspace.
Step 3: Setting Up the Power BI Gateway
If a Power BI gateway is already configured, skip to the next section. Otherwise, set up the gateway on a VM or server using PowerShell. Once that's done, establish the required data sources, with the credentials to authenticate to them. The service principal can then bind data sources for datasets, so data access works across environments.
More information and useful pieces of scripts on this topic:
If this is already set-up you can skip these steps
Step 4: Deploying Datasets with Tabular Editor CLI
For dataset deployment, the Tabular Editor CLI is a strong choice, provided you're on Power BI Premium, Premium Per User or a Fabric Capacity. Only in those cases can you use the XMLA-endpoint of the workspace to deploy your data model. Depending on your solution, you can overwrite the parameters of the semantic model in your .BIM file, or pass the correct ones with the command as the "connection". The .BIM file contains the logic of the dataset.
The code I'm using to deploy the dataset to our Power BI Workspace:
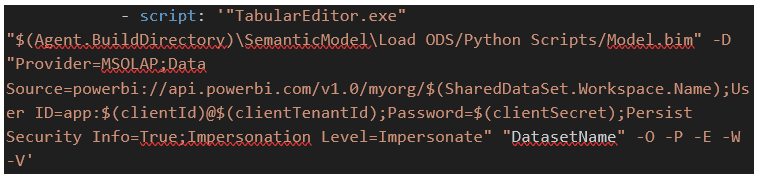
TIP When deploying with Tabular Editor CLI in a DevOps pipeline, the parameter -V is pretty useful. Otherwise your pipeline will throw errors when deploying new tables or measures that are still "Unprocessed" at the moment of deployment.
Step 5: Linking Reports to Datasets
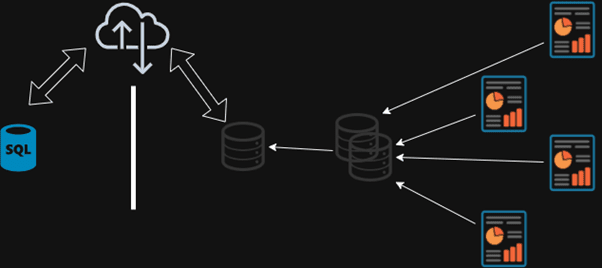
For report linking, use Power BI's newer .pbip file format. It lets you adjust the connection file and link reports to the correct datasets without needing to manipulate .pbix files directly (like it was in the past..), and without the risk of duplicating reports.
TIP: Do some API calls to find out the correct ID of the semantic model you will be connecting to, and assign it in the .connections file. When uploading this file it will be replaced/updated instead of appearing as a "new report", because it is linked to another semantic model.
TIP: With the PowerShell cmdlet New-PowerBIReport you can deploy the corrected report for the right environment to the workspace.
Step 6: Publishing for End-Users
One thing cannot be automated at this moment in time: there is no cmdlet or API call to define or update a Power BI App. With the Power BI Pipelines it can be an option, but I haven't invested time in that, because my tailor-made solution had to deploy to other tenants and those pipelines weren't an option there. You can treat this as end-user acceptance: include a step in the process where the published reports are checked and confirmed before the app is updated.
Wrap up
Once the setup is done, an automated CI/CD process lets you quickly provide workspaces, preconfigured data sources and linked reports, with minimal, almost no manual interaction. Deployments across environments become quick and repeatable, so you iterate faster and make fewer errors.
TIP: A last tip, and maybe a personal one. I search on names instead of keeping track of IDs when doing the API calls. A workspace can be deleted and recreated with the same name; when holding on to IDs, you need to fix this parameter and spend time maintaining variables in libraries. When using names, your code adapts and searches for the right ID to use in further steps.
Want to implement this in your workflow, too?

Neil Van den Broeck
Neil studied Applied Computer Science with a focus on Business Intelligence and has been building data platforms for several years. He works across Azure, Databricks, and Power BI, with a strong focus on data engineering and platform architecture. Efficiency is his thing: if something can be automated or streamlined, he'll find the way.