
How to Simplify Deployment Pipelines: One Parameter to Rule Them All
Introduction
If you work with Power BI, chances are you're using Deployment Pipelines to manage your content across environments. These pipelines provide an intuitive interface that lets you move specific changes in reports or semantic models between stages, each linked to a dedicated workspace.
One of the key features that makes this process smoother is auto-binding. When you deploy a report from the development stage (where it's connected to the development semantic model) to the acceptance stage, auto-binding automatically links it to the corresponding semantic model in that environment. This saves time and reduces manual errors.
However, auto-binding has its limits. While it works well for reports and their associated models, it doesn't apply to the data sources within semantic models, unless you're using dataflows. For example, you might connect to a Synapse source in development, but in acceptance, you need to switch to the acceptance version of that source.
This is where Power BI Parameters come in. Parameters allow you to manage source connections dynamically within your deployment pipeline. As your models grow in complexity and the number of data sources increases, so does the challenge of managing these parameters effectively.
Often, you'll need a parameter for each source like p_synapse and sometimes even separate ones per environment: p_synapse_dev, p_synapse_acc, p_synapse_prd. It's easy to see how quickly a semantic model can become cluttered when dealing with multiple sources.
And creating parameters is just the beginning. In your deployment pipeline, you also need to ensure each parameter is assigned the correct value. a Repetitive and error-prone task, especially when new sources are added.
In this article, we’ll explore strategies to simplify parameter management and streamline your workflow when working with complex models and deployment pipelines.
Power BI Parameters
Let’s look at an example where Power BI Parameters can help us manage our sources. In our semantic model, we are loading data from a Databricks source for multiple tables.
Instead of repeating the connection string for this source in each query that uses this connection, we can leverage Power BI Parameters to define the connection info in one place – and reference the parameter across any table needing this source. This means that if the Databricks source should be changed, you only need to modify the parameters, instead of having to edit the query for all tables using this source.
We can do this by defining two parameters: p_databricks_server and p_databricks_httppath.

Next, we publish our model to the DEV Power BI workspace. Since the parameters contain DEV values, the model automatically connects to the DEV Databricks.
So far, so good. But when we move to the acceptance environment, things get trickier. If we simply deploy the semantic model from DEV to ACC, it still points to DEV. No worries, we just need to set up parameter rules and assign the correct values for ACC.
This approach works… until your model starts using multiple sources. Then the list of parameters grows, and managing them (and their rules) becomes messy and error-prone.
Wouldn’t it be easier to have just one parameter to indicate the environment—DEV, ACC, PRD—and let the semantic model handle the rest?
Using One Parameter to Automatically Switch Sources
In this article, you’ll learn how to use a single parameter to automatically switch data sources based on the workspace your semantic model is deployed to.
Let’s walk through the steps:
1. Creating the Environment Parameter

Start by creating a new parameter in your semantic model called p_env.
Set the type to Text, this is crucial, as only text parameters will appear in the deployment pipeline’s parameter rules.
You can define values that represent your workspace stages, such as:
- DEV
- ACC
- PRD
2. Building the GetSource() Function
We still need a way to store source information for each environment. Instead of managing this in the deployment pipeline, we’ll embed it directly in the model using a custom function.
This function will return the correct connection string based on the current value of p_env.
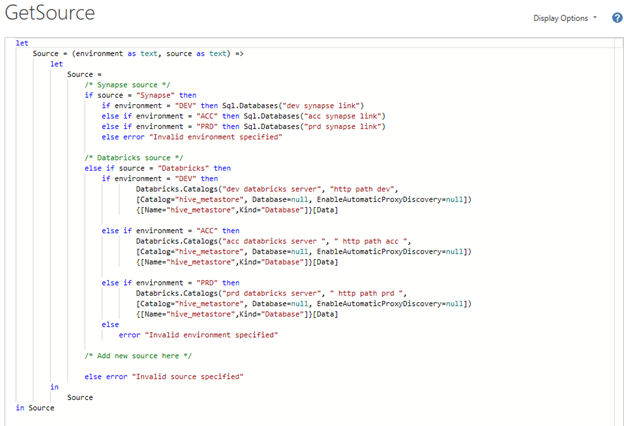
The function handles two source types: Synapse and Databricks.
It uses conditional logic to:
· Check which source type was requested
· Return the appropriate connection string based on the environment
· Throw an error if the source type is invalid
3. Referencing GetSource()
Now that the function is set up, you can use it in your M-queries to dynamically retrieve the correct source.
Here you can see an example of what this could look like:
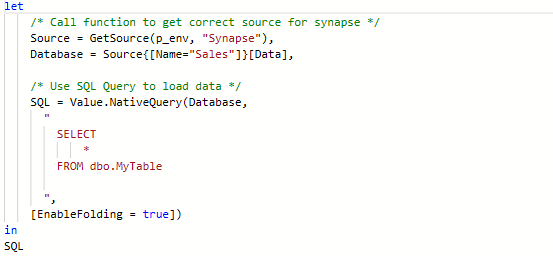
Here:
p_env is the parameter you created earlier
"Synapse" is the source type you want to connect to
If p_env is set to "PRD", this will return the Synapse production connection string.
4. Making it Dynamic in Deployment Pipelines
To complete the setup, you’ll need to configure the p_env parameter in your deployment pipeline.
For each stage (DEV, ACC, PRD), set the appropriate value for p_env in the pipeline’s parameter rules. This ensures that your model automatically connects to the correct source based on the workspace it’s deployed to.

Bonus Tip: Dynamic Report Linking Based on Environment
With a small tweak to your setup, you can also pass the current environment to the report layer, making it possible to dynamically adjust links between reports.
Why This Matters
Imagine your Sales report includes a button linking to the Orders report. In production, this link points to the Orders report in the production workspace, perfect for the live app.
But during testing, users in the acceptance app still get redirected to the production report. This breaks the test flow and can cause confusion.
Let’s fix that.
1. Create an Environment Table
Add a table to your semantic model with a column listing all environment values:

2. Filter the Table with p_env
Apply a filter to this table using the p_env parameter, so only the current environment row is active.

3. Create an Environment Measure
Add a DAX measure in the semantic model to return the current environment.

4. Use the environment measure in reports
Use the Env measure to dynamically build URLs in buttons or navigation actions. For example:

Bind this measure to a button’s action or use it in a tooltip to guide users.
This way, your report links will always point to the correct environment. Ensuring that test users stay within the acceptance app and production users get the live experience.
Conclusion
While this setup takes a bit more time to build, it’s well worth the effort. Compared to the common approach of creating separate parameters for each source, you only need one parameter and one reusable function greatly simplifying the process of creating new queries in Power Query.
Additionally, centralizing source logic within the semantic model makes adjustments easier and streamlines your deployment pipeline. No more manually checking which connection string to use for each environment.
And as a bonus, this setup can even be extended to the report layer, allowing you to dynamically adjust report links and even content based on the current workspace. This ensures a seamless experience for both test users and production users.
In short, this approach reduces complexity, improves maintainability, and scales effortlessly as your models grow.
Want to optimize your Power BI Deployment process? Our Power BI Professionals are looking forward to help you realize this!
